
|
I actually went looking for this gun cabinet. I had this crazy idea that I wanted to turn an old gun cabinet into a curio. I pictured it being painted bright yellow and set up in a kitchen with a cute little tea set collection inside displayed on all its new shelves. I pictured a little hook on the side where one would hang their oven mittens and kitchen aprons. Well guess what!???!! That is not what happened. Every used gun cabinet I found had a sale price of $120 or more and no one wanted to budge on their price...until I found this little cutie. The previous owner of this one wanted it gone and negotiated a decent price.  And of course it wasn't until I picked it up to realize just why they wanted it gone. If only you could smell a photo. This cabinet reeked in the worst way. I can't even describe the smell to you. Certainly it was from a smokers house. But it also smelled musty and every other bad smell you can think of combined with smokey and musty. I'm not kiddy. I hesitated to load it in my car in fear that my car would then reek for days, weeks, or maybe forever. I rolled all the windows down as I drove this one home. You can imagine my husbands enthusiasm when he saw (and smelled) this sitting in the garage. I got a, "you paid money for this?" And if you must know, it wasn't just the smell. Every crevasse of this little thing was full of roach eggs and spider webs and bug poop. Lets just sum it all up and say it was beyond gross. So I did what any normal person would do. I took it completely apart and sprayed it with a bed bug killer and Raid concoction, rubbed it down with a vinegar solution and taped dyer sheets to it to absorb the smells and kept it outside in the sunshine for days. One thing I really loved about this cabinet was the etched duck on the front. When I bought this I knew it wasn't going to be painted bright yellow to house someone's tea cup collection, rather, I knew this was going to have a hunting theme to it and would go into a little boys or girls room who loved hunting and it would house his or her clothes or toys. Or possibly it would go in a man cave or home office to be used as a liquor cabinet. Especially since I planned to make it lockable. 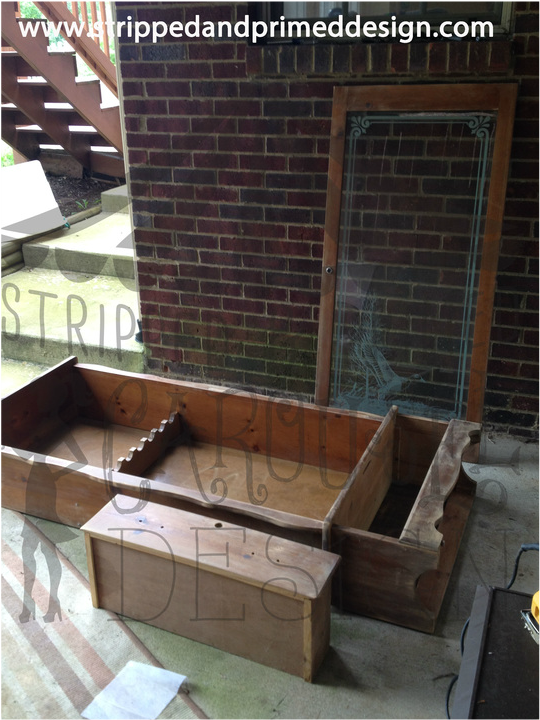 After the first step of taking it all apart to de-bug it and try to de-smell it, I worked hard on sanding it all down. And sanding it some more. And sanding it again. I believe that when refinishing a piece it is important to sand it down to its bare self. Hence the name "Stripped and primed". It's one thing to just paint over it with some chaulk paint and make it beautiful. I love chalk paint. Love it, love it, love it. But often its used to paint over all the previous layers. And sometimes that is okay. However, I feel like it's can be similar to moving into a house to peel the previous owners wallpaper only to find 6 different layers under it. So to me it is often important to get it back to where it started and then lets make it new from there. 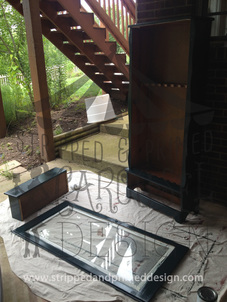 After it was sanding, and sanded and sanded, I wiped it down with a wet cloth and let it dry. I began the painting process. I chose a hunters green. A lot of thought went into choosing this color. Not really. That was a joke. I used this color because we had a whole gallon of it left over from when my husband built the kids sandbox in the back yard and he painted the bottom of it green. When I first began to paint the green was quite bright and so I mixed it with some left over black paint we had from when we painted our mailbox. Both were outdoor/indoor latex paint and they mixed nicely to form this dark green color. Perfect for my Camo Cuiro I was creating! 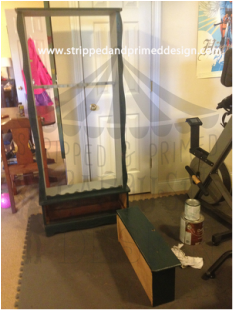 I took the back panel off and painted the interior of the cabinet grey to give it some dimension. I debated whether or not I should paint the back panel grey as well, but decided it would be really fun if I could find some awesome hunting fabric or contact paper to cover the back panel in. I ended up settling with a fabric because I felt it would be more durable than contact paper. I cut shelves and painted them grey as well. I installed the shelves with simple L-brackets and not only did I line the back board in a hunting fabric, but I also lined the bottom drawer with the same fabric. It was beginning to look amazing. But even once I had put it all back together there were so many finishing touches that still needed to be tended too. 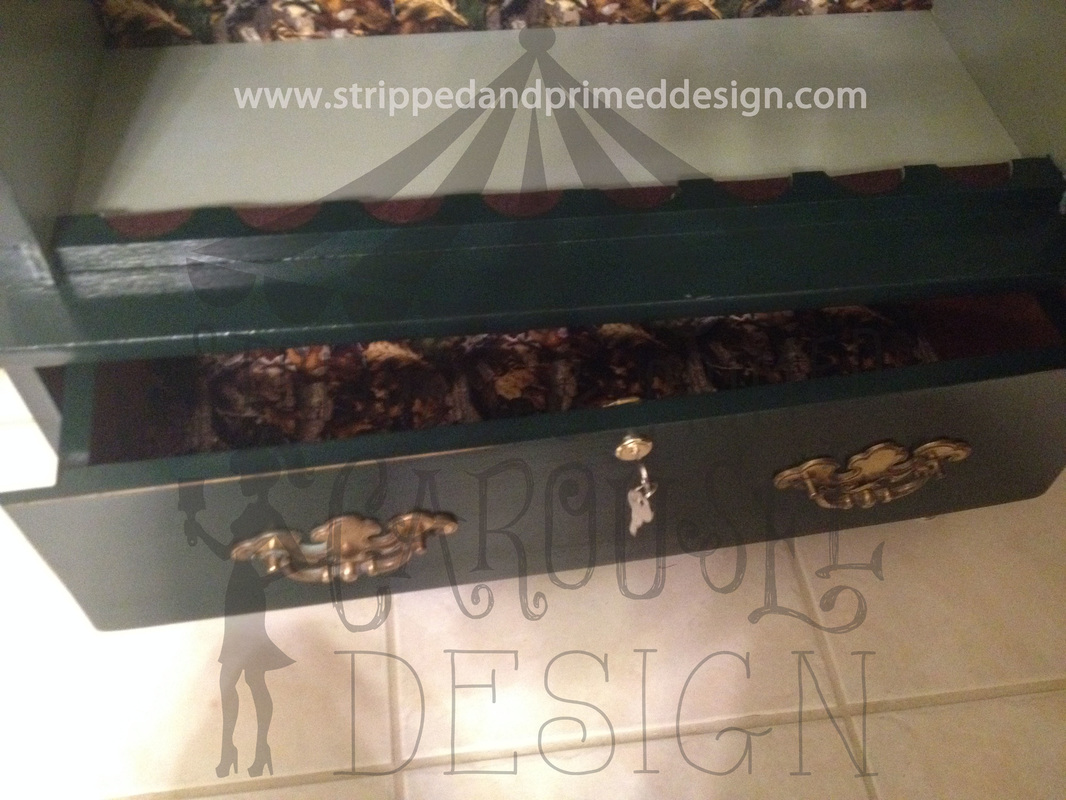 I removed the old locks that no longer had keys as one was a silver and one was bronze. I keyed them alike with new gold keys to match the pulls. I had to polish the pulls and while I thought about replacing them, I decided to keep them because I really loved the character. They just took a lot of polish and elbow grease but cleaned up nicely. I added new felt to where the half circles were to rest the guns on previously, but I liked the detail there so just needed fresh felt. I added a pull handle to the cabinet that was not there before. I installed new leveling glides on the bottom so it no longer tilted or rocked when upright and I also had to realign the glass cabinet door so it no longer rubbed on the bottom when opening and closing. I gave a good sanding at the end to give it a wear-and-tear look and then I put several coats of polyurethane on it to keep the paint from chipping in the future. Overall I am extremely proud of how this "Camo Curio" turned out and I think it would make such an awesome addition to a boy or girls hunting theme room. It would also fit great into a man cave. You could put books in it, or collectables, or would make a perfect liquor cabinet you need to be able to lock your children or spouse out of with a perfect drawer at the bottom for your cigars. All in all, I'm in love with it and I hope you like how it turned out too! 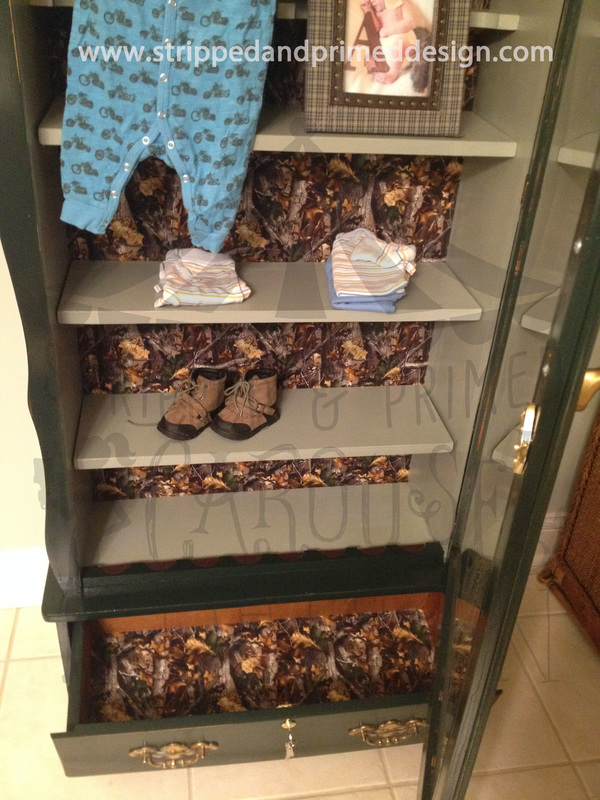 Heres a final look. 
10 Comments
I mean really, is there anything cooler than a gorgeous Mid-Century Chair? Check out this beauty that I picked up at a garage sale. 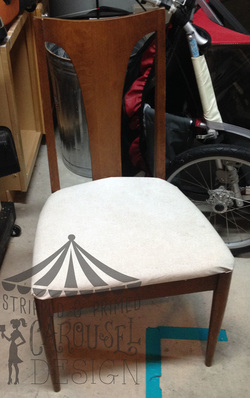 I will not be painting this girl. I will be polishing up the stain and I already have my fabric picked out. I am going to pair it up with an amazing sewing stool from the mid-century as well that I came across not too long ago! I almost passed up the stool because it had missing buttons and was ripped where they used to be. I try to follow my rule not to buy anything broken...but how hard can it be to find the right size fabric buttons and cover them in fabric and and sew them back in? I guess I'll find out soon. This chair and the sewing stool look like they were a match made in heaven and they haven't even been refinished yet! I am super excited about getting started on this project. I actually thought this was a Bernhardt chair when I first picked it up. But with a quick google search I found it here and here. Looks like a Broyhill Brasilia Chair. Pretty cool huh? I was not actually out garage-sale-ing it, I was headed to the grocery store and I had just my two girls with me. They noticed the garage sale on our way to the store and asked if we could stop. Of course I said yes! But oddly it was 4pm on a Saturday afternoon. The girls picked out a little pink ring and watch and I got this baby.
It's been a several weeks now and on my recent trips to the grocery store driving the same route, I've noticed about 5 more of these chairs in the garage of a house two doors down from where the garage sale was. Did the person I buy this from borrow it from their neighbor and then sell it to me? Crazy to think of the possibilities there. I am so tempted to knock on the door where I saw the others in the garage and ask if I can buy them. Or maybe I should let them know I have their missing chair? But I'm certain they'll want it back! What should I do? Well in the meantime I have big plans for this beauty! If you love her now, just wait until I'm done with her....or maybe all 6 of them if I dare go knock on the door... I had plans to go out for a glass of wine with a friend after the children were in bed. This is a rare occasion. And quite frankly I can't remember if it's ever happened before. I'm guessing it has but after 4 kids my memory is shot so in actuality it may be an isolated occasion. The only one of its kind so far...or at least in the last few years. I knew I needed to fill my children's belly's before I left and especially my husbands, because let's face it, he'll have a much better attitude about me leaving him with four children if he is served a nice warm meal upon arriving home from work. I enjoy cooking for my family but sometimes I just don't feel like cooking! Do you know that feeling? You may feel the same way sometimes so you throw a frozen meal in the oven and wallah! Dinner is served! And there is nothing wrong with that! I personally did not grow up eating frozen meals and therefore rarely buy them and my freezer is definitely not stocked up with them. We cook the occasional frozen pizza or chicken nuggets here and there but that's really about it. So this meal is not a frozen meal per say, although a lot of the food started our frozen! And this mean is really nothing exciting, just easy, healthy and filling! If you don't already have a similar meal stashed away in your recipe book or dinner menu then I hope you will try it. Here's what you will need:
 Step 1: You'll need to thaw the chicken in the marinade. Around 2pm that afternoon I took out four frozen chicken breasts and put them in a zip lock bag. I filled the ziplock bag with 1/4th of the Maple Syrup jar and about half of the Teriyaki sauce bottle. I left the zip lock bag full of my marinade and chicken in cold water in the sink for about an hour then transferred to the fridge as it continued to thaw. I didn't touch anything again until 5pm and 25 minutes later dinner was served. Step 2: Preheat your oven to 400 (I used the conventional setting on my oven, but if you don't have a conventional setting, just go ahead and set it to 400 as well and you'll need to cook it longer). Step 3: Arranged the chicken on the pan and set the timer for 10 minutes if using a conventional oven. Otherwise set for 15 minutes. Step 4: Flip your chicken over. After 10 minutes I flipped chicken and cooked another 10 minutes for a total of 20 minutes in the oven. (if not using a conventional oven, cook another 15 minutes on the other side). Step 5: While your chicken is in the oven cook your macaroni and Edemame per the package instructions. Within 25 minutes my stove looked like this:  And just like that dinner was served.  Belly's were full. Children and husband were happy and this momma went out and enjoyed a glass of wine and good conversation with a friend. Now it's your turn to do the same... Please share with me what meals you have made that are similar to this one. If you have tried this please let me know what you think! Would love to hear your feedback! Moms of one only child, I commend you! While it is undoubtably hard work being the mother of four young children I can only imagine the work that goes into having just one child! I'm not at all kidding or trying to be facetious! I had only one child once...and while it was for less than two years....I do remember it being hard then. Of course I was juggling working full time and being a new mommy, but it was hard. It was like having two full time jobs because this little 6 lb bundle sucked the like out of me, needed me constantly and as demanding and selfish as she was all I wanted was to be around her. I enjoyed my breaks from her when I was working but I felt the mommy guilt that I wasn't giving her enough of my time. So much guilt. And now on Wednesdays I again have just one child. My youngest is home alone with me from 8am until we pick the big kids up from school at 3:30...and while he is so easy when it's just him alone in some ways, he is still so much work! Almost more work than when all four kids are home because he's got no one there but me. "Play with me mommy!" He says all day long. "Read to me mommy" he says all day long. "Hold me mommy" he says all day long. And so we play. Me and my little buddy. And I do what is almost the hardest thing for me to do...I put laundry aside, kitchen duty aside, chores aside, I put myself aside and I play. And sometimes I remember how much joy their is in playing with your own children. It's a lot of work. But it's a lot of fun if you make the effort. You have to be intentional about it or else you'll never know. You have to do the hard work and put yourself aside.  Having more than one child I just tell them constantly to "go play together" or "I'm busy, you need to go play with your brothers and sisters". They don't need me to play with them, they only need me to care for them...but that's a lie! Who knew playing was so hard? But as a mother it is! Setting aside your own to-do list. Setting aside your wants and needs to spend uninterrupted time with your child can be hard! Moms, let's unite and make playing less hard. Let's strip off the stigmas that moms can't be silly and play with our child...or two...or three...or four of them...and let's take time to play.  It seems fitting that one of my first blog posts on this site should include some actual stripping. And stripping is required to do this fun craft with your kids! No one wants to see an adult "Bumpkin Patch" so please leave adults out of this one and only use your itty bitty bottoms in your house! First what you will need: 
Directions:


 As I had mentioned this all began with an idea in the basement and well, as I also mentioned, I am still in the basement!
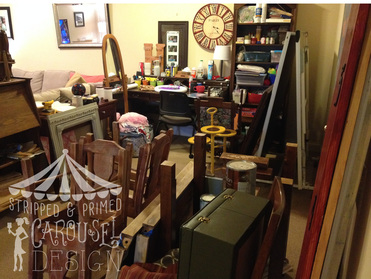
Welcome to my office. I thought my first blog post on this site should be me showing you where this sanding and priming is taking place. I'm not sure about you, but personally I do really well when I have lots of projects going on at once. There are just times that after I begin a project I get a little stuck and cannot see it all the way through. I lose inspiration and need time to set it aside and not work on it for a while until the inspiration comes back. Don't get me wrong, an unfinished project drives me a little batty, but I simply cannot finish it until the inspiration is there (or until my 4 children are not in my way) and often times other projects help inspire each other. So while I let one project sit and rest, I begin another project. I actually cannot wait to start on the secretary you see in this photo. I picked out my finishes for it already (which I will keep a secret) but to ensure that I was satisfied with the finishes I chose to use them on a smaller piece to be sure I was going to love it on such a beautiful secretary desk as the one in the photo! And guess what?!? I did love it on the smaller piece so it won't be long now. You'll just have to wait for it's reveal. In the upcoming blogs I'll show you the gun cabinet I turned into an awesome Camo Curio! I have a cute little "Bumpkin Patch" craft for you to do with your kiddos that you're going to love and I'll show you how NOT TO sew a bench seat cover. Very exciting stuff, I know. So look for it. It is coming... |
AuthorI am a mother of 4 small children. I am happiest when I am busiest and if the kids don't keep me busy enough I need projects to fill my days. I love Jesus and I love my family and I love the chaos around me for it brings the calm. Archives
October 2022
Categories
All
|
 RSS Feed